
What is Optical Aberration?
To get the best image quality, a lens must correct for optical aberrations. Without the proper corrections, images can end up blurring in some way and losing vital image data. This blog focusses on six optical aberrations, how they occur, and how to prevent them / reduce their negative impacts.
An optical aberration refers to a defect in a lens design which causes light to spread out instead of focusing to form a sharp image. This ranges from all the light in an image to only certain spots or edges being out of focus. There are several types of optical aberrations that can occur when imaging. Building an ideal vision system that has all possible aberrations corrected would add significantly to the cost of a lens. In practice, there is always some form of aberration that can be found in a lens, but minimizing the effects of aberration is crucial. Therefore, there are usually some compromises that are made for making any lens.
To explain how aberrations blur an image, it is be useful to first explain: what is a circle of confusion? As a point of light from a target reaches the lens and then converges at the sensor, it will be sharp. Otherwise, if it converges before or after the sensor there will be a wider distribution of the light on the sensor. This can be seen in Figure 1, where a point source of light can be seen converging at the sensor, but as the sensor’s position changes, so does the amount of light spread out along the sensor.
The more spread out the light becomes, the less in focus the image will be. Unless the aperture is small, targets that have a large distance from each other in an image will often have either the background or foreground out of focus. This is because light converging in the foreground will converge at a different point than light from a target farther away in the background. For more information on the advantages of aperture utilization in vision systems, read the Teledyne Lumenera blog, “Improving Imaging System Performance With Lens Aperture Optimization.“
Coma
Coma causes light that should focus as a single point in an image and turns it into a cone of light. This is because with coma, light entering at different parts of the lens will focus farther and farther apart along the image plane where the sensor is positioned.
Light that enters the lens at an angle can cause light to form a trail of expanding circles of confusion on the image plane. This can cause a trail of expanding light to affect any point source of light trying to be imaged, as seen in Figure 2. At the top of Figure 2, the coma aberration image can be seen as the point source with downward expanding circles of confusion, creating a cone shaped image. This is often the result of having misaligned optics.

Coma happens with point sources of light, such as stars, which is why this is a particularly important aberration for astrophotography. By reducing the aperture, some light rays that cause the effect can be removed, but for something like astrophotography, a lot of the subject matter that needs to be imaged is removed. In such cases, lenses designed specifically for coma correction are required.
Astigmatism
Rays that propagate in two perpendicular planes can have astigmatism when they focus at different points. This can be seen in Figure 3 where the two points of focus are represented by the red horizontal and blue vertical planes. The point of optimal sharpness in the image will be between these two points where the circle of confusion for either plane is not too wide. Astigmatism causes distortion along the sides and edges of an image when optics are misaligned. It is often described as the lack of sharpness when looking at a line within an image. Coma and astigmatism are usually the result of similar misalignment of the internal optics of a lens system. When astigmatism is worsened, it is safe say that coma will also occur.
This form of aberration can be corrected using the proper lens designs found in most quality optics. The initial designs for optics that fixed astigmatism were done by Carl Zeiss and have been developed upon for over a hundred years. At this point it is usually only found in lenses that are either very low quality or in cases where the internal optics have been damaged or moved through a drop of the lens.
(Petzval) Field Curvature
Many lenses have a rounded field of focus. This can cause soft corners of an image and primarily keeps the centre of an image in focus. However, most lenses have some rounded field of focus and cannot focus an entire image without some cropping. This is due to the curved surface of most lens optics. Field curvature is the result of the image plane not being flat due to multiple focal points. In Figure 4, the image plane is shown as curved because each focal point is at a different plane perpendicular to the optical axis. When a line is used to connect these points, it shows a curved plane. By having light enter the lens off the optical axis, the result is a focal point not focusing at the sensor.
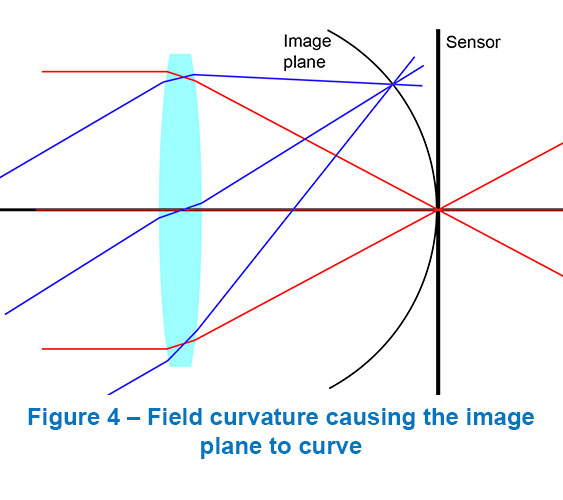
Camera lenses have largely corrected for this, but some field curvature is likely to be found on many lenses. Some sensor manufactures are actually working on curved sensors that correct for the curved field of focus. This design would allow the sensor to correct for the aberration instead of requiring expensive lens designs to be produced with such precision. By implementing this type of sensor more inexpensive lenses could be used to produce high quality results. Real life examples of this can be seen in the Kepler space observatory where a curved sensor array is used to correct for the telescope’s large spherical optics. For more information on the Kepler telescope, see https://www.nasa.gov/mission_pages/kepler/main/index.html.
Distortion
Distortion refers the way an image is warped toward the edges and sides of the image frame. For cameras that use very high focal lengths or very low focal lengths, the distortion effects can be most prominent. The two most common forms of distortion are barrel and pincushion distortion.
Barrel distortion
Images with barrel distortion have the edges and sides curved away from the center. This visually seems like there is a bulge in the image as it captures the appearance of a curved field of view (FoV). For example, when using a lower focal length lens (also called a wide-angle lens) from high up in a tall building, a much wider FoV can be captured. This is most exaggerated when using a fisheye lens that produces a very distorted and wide FoV, as seen in Figure 5. In this image grid lines are used to help illustrate how the distortion effect is creating a more stretched image outward closer to the sides and edges.
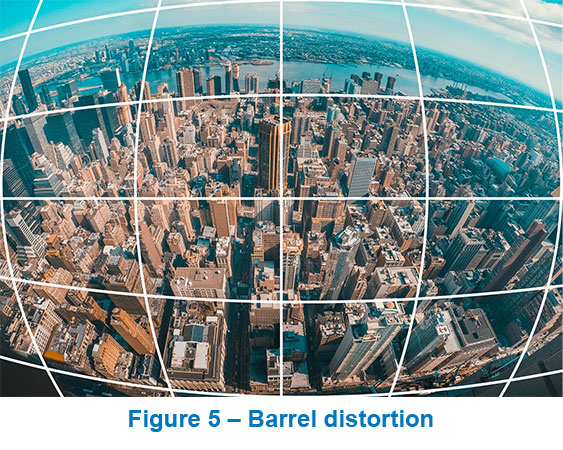
The light entering the lens is being bent away from the optical axis and causes barrel distortion. In the case of a wide-angle lens, the added benefit of having a much wider FoV can be more significant than the aberration on the ends of the images by providing a larger area to imaged. It should be noted that there are rectilinear lenses that compensate for barrel distortion and straighten the FoV. This can be important for image analysis the requires the use of a short focal length.
For aerial imaging that requires a wide FoV to better capture the landscape, the alternative to using very low focal lengths is using multiple side-by-side cameras. Since the most important part for imaging a wide area is the sensor’s pixel width and not the full resolution of the camera, capturing images with multiple cameras simultaneously can be quite beneficial. This is explored further in the Teledyne Lumenera white paper, "Using a Single Versus Multiple Cameras in Aerial Imaging."
However, this is viable at certain altitudes, but in most cases, at a certain height a camera will require a longer focal length to be able to clearly image targets that are farther away. Therefore, wide-angle lenses can provide detail for aerial imaging or other applications such as precision agriculture, but altitude requirements need to be considered. The key factor is the Ground Sampling Distance (GSD) that the vision system will require. In environments were a camera is fixed and the height of the camera remains constant, such as a greenhouse, using a wide-angle lens can help image most of the target environment. To understand more about GSD and how to set up an aerial imaging system, read the Teledyne Lumenera blog, “The Challenge of Aerial Imaging: Achieving a Clear and Sharp Image.“
Pincushion distortion
When light is being bent toward the optical axis through pincushion distortion, the image appears to be stretched inwards. Therefore, the edges and sides of the image will seem curved toward the center of the image, as seen in Figure 6, where the grid lines bend toward the center the farther out they get.

This form of aberration is most common with telephoto lenses that have longer focal lengths. A telephoto lens will zoom in on a target within the image and the longer the focal length, the more cropped and zoomed the resulting image will be. As with other aberrations, it mainly affects the edges and sides of the image. Therefore, the easiest way to keep an image in focus is to apply a smaller aperture to the lens. In Figure 6, the center of the image remains undistorted, so by using a smaller aperture, the distorted light that would be entering from the edge ends up blocked.
Mustache distortion
Mustache distortion is a combination of both pincushion and barrel distortion. This causes the inner part of the image to bend away and the outer part of the image to bend inward. Mustache distortion is a rather rare aberration where more than one distortion pattern is affecting an image. Mustache distortion is usually a sign that the lens is very poorly designed, as this is a culmination of optical mistakes causing a fusion of aberrations.
Defocus
Almost anyone who has used a camera of some kind is familiar with defocus aberration. When an image is simply out of focus, it is experiencing defocus aberration. A reduction in sharpness and contrast in an image will cause details to become more blurred with gradual transitions.
This is usually because none of the targets within the image are at a position where the light emitting or reflecting from them converges at the sensor. This means the light will focus at a different image plane far enough from the sensor causing the image to be completely blurred. All the light will have a large enough circle of confusion to appear completely out of focus, as seen in Figure 7.

To fix defocusing, simply adjust the focus on the lens or the position of the camera until the target is in focus. However, in certain conditions the camera can not focus on a specific target. This is often based on distance, either a subject is too close or too far from the lens. In the case where no focus can be achieved, a different camera lens may need to be applied to change the focal length and minimum focus distance. Alternatively, stepping down the aperture can allow the lens to focus on additional targets that are farther away, effectively increasing the depth of field which is the distance between the closest and farthest target that remain in focus. To understand what type of focal length a vision system requires, read the TeledyneLumenera white paper, "Getting it Right: Selecting a Lens for a Vision System."
Chromatic
Longitudinal / axial aberration
The color of light represents a particular wavelength of light. A color image will have multiple wavelengths entering the lens and focusing at different points due to refraction. Longitudinal or axial chromatic aberration is caused by having different wavelengths focusing at different points along the optical axis. The shorter the wavelength the closer its focal point will be to the lens, while the opposite is true for longer wavelengths focusing farther away from the lens, as shown in Figure 8. By introducing a smaller aperture, the light entering may still focus at different points but the width (diameter) of the “circles of confusion” will be much smaller and result in less drastic blurring.
Transverse / lateral aberration
Off-axis light that results in different wavelengths being distributed along the image plane is transverse or lateral chromatic aberration. This results in color fringing along the edges of subjects within the image. This is harder to correct than longitudinal chromatic aberration.
It can be fixed using an achromatic doublet that introduces different indices of refraction. By bringing the two ends of the visible spectrum over to one focus point, color fringing can be removed. For both lateral and longitudinal chromatic aberration, reducing the size of the aperture can also help. Additionally, it can be beneficial to not image targets in high contrast environments (i.e. images which have very light backgrounds). In microscopy, a lens might use an apochromat (APO) instead of an achromat lens which uses three lens elements to correct for all the wavelengths of the incoming light. When color is of the upmost importance, ensuring chromatic aberration is mitigated will produce the best results.
The Bottom Line
As sensor pixel counts continue to increase, the weakness in the lens design can become more obvious with worse aberrations becoming apparent. There are several types of aberrations, but a consistent trend is that they blur the image near the sides and edges.
The simplest way to improve focus on an image so more of the FoV remains in focus is to apply a smaller aperture to the lens. This is the general go-to solution in situations that have little aberration occurring. This will provide a longer depth of field, but will also reduce the brightness of the image. Therefore, this is only a viable solution when adequate lighting is available.
However, optics within a lens system can get misaligned. In these cases where aberration is very strong, a closer look at the internal optics of a camera lens may be the only solution. To avoid this, a lens should always be handled with care and secured to avoid excess shocks or vibration. Some aberrations can be repaired by adjusting the internal optics of a lens, but this requires a lot of precision work and is only advised to be done by trained professionals.
It should be noted that another common aberration is spherical aberration. Due to the shape of spherical lens elements having a curved surface, light will bend at a steeper angle the closer it gets to the edge, causing it to focus at different points along the optical axis. To read more about spherical aberration, read the dedicated blog, “Minimizing Spherical Aberration: Make The Right Lens Choice For Your Imaging System.“
For more information, please contact Teledyne Lumenera’s imaging experts. They can also help with selecting the cameras to best meet your requirements. Reach out at [email protected].
And, sign up for our newsletter to automatically receive regular updates from Teledyne Lumenera.
